![]()
![]()
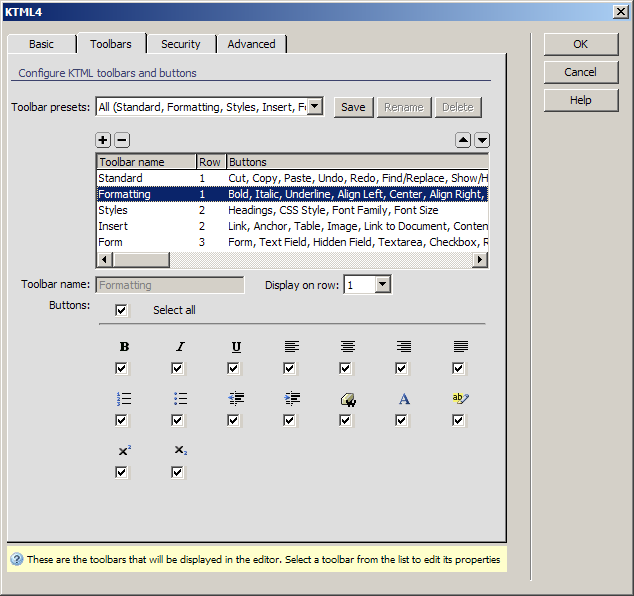
The Toolbars tab of the KTML
4 server behavior allows you to define what toolbars and specific
buttons to display in the editor:

To configure this tab, follow the instructions below:
In the Toolbar presets drop-down menu select one of the saved configurations to use (as it is, or after altering it). After configuring the toolbars as you need them, you can save and re-use the same configuration later on.
After modifying an existing toolbar preset (one of the default, or even one of your own), click the Save button to retain it for later use.
If you click this button without making any
changes to the selected preset, a dialog message will inform you that
there are no changes to be saved:

When you make modifications in the toolbar
configuration, you will notice how the option displayed in the Toolbar
presets drop-down menu changes (if the case) so that it best matches
the configuration you are building (it could be similar to a preset previously
configured or to one of the default ones).
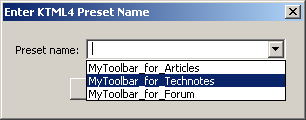
When clicking the Save button, a dialog
box will be displayed asking you to enter the name of the new toolbar
preset in the editable drop-down menu. This menu displays all the names
of the custom toolbar presets you created (if any). If what you did was
to alter one of your toolbar presets, select its name in the editable
drop-down menu to overwrite the changes:

After entering/selecting the desired name, press OK
to save the new toolbar configuration. It will then be available in the
Toolbar preset drop-down menu of the server
behavior interface.
Note: Toolbar presets cannot be saved in the
Lite version of the editor.
To change the name of an existing custom preset, select it from the drop-down menu and click the Rename button (enabled only for custom toolbar presets). A dialog box will be displayed asking for the new name. Enter it in the text box and click OK to apply the change.
If a toolbar preset is no longer needed, you can remove it from the list. First select it in the drop-down menu and then click the Delete button (enabled only for custom toolbar presets). A confirmation dialog will be displayed once the delete operation completed.
In the Toolbar grid you can see all the configuration options for the current preset: the toolbar name, the row on which it will be displayed and the buttons it contains. To edit any of the properties, select the toolbar in the list and use the controls below to change them.
In the Toolbar name text box, the name of the currently selected toolbar is displayed. This control is disabled, as it is only meant to show the current selection.
In the Display on row drop-down menu select the row on which to display the selected toolbar. Since there are 5 toolbars, there can be at most 5 rows (in case you choose to display each toolbar on its row). In order to avoid 'holes' in the top area of the KTML 4 editor, the options in the Display on row drop-down menu modify dynamically, according to the rows you set for the other toolbars.
With the Select all checkbox check or uncheck all the buttons for the currently selected toolbar, at once. If you wish to make individual selections, simply check or uncheck the checkbox corresponding to each button from the toolbar.
Click on the Security tab to continue with configuring the KTML 4 server behavior.
The controls on this tab do not use the User Interface Persistence. The toolbar presets that you create and save are stored in an XML file: <system_drive>:\Documents and Settings\[USER]\Application Data\Macromedia\Dreamweaver 8\Configuration\Shared\InterAKT\KTML4ToolbarPresets.xml. You can edit or copy this file between different Dreamweaver configuration folders to ensure that your presets will be available for save and load from within the KTML 4 interface, even after you have created a new configuration folder. You can also edit this file to change your preset.