![]()
|
|
![]()
|
|
In order to insert a special character in page when the keyboard does
not come at hand, click the Special Character
button from the toolbar:
![]()
The button has two areas:
Click the icon on the left to use the currently selected character (shown by the icon).
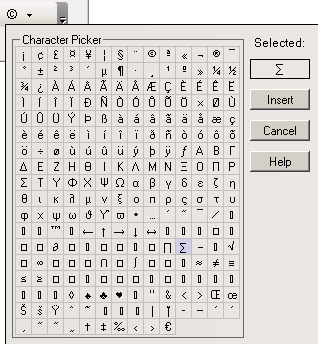
By clicking the arrow on the right, the Character Picker window will be displayed allowing
you to select the character that you need. It displays a matrix of characters
from which you can choose.
Note: You can define yourself the special characters list displayed
in the matrix in a configuration file. There is a default character list
defined in case you make no changes in the configuration file. Read more
about this in the API documentation.
The Character Picker interface presents the
following elements:

The Selected display item shows the symbol you select in the matrix (single-click).
Click Insert to insert the selected character in page.
Click Cancel to annul any character selection or insertion in your page.
The Help button opens the contextual help window.
By pressing the Horizontal Rule button, you
can insert a horizontal line in page at the point where the cursor is:
![]()
A horizontal rule will help you visually separate elements.
The Horizontal Rule Properties panel is displayed
when you select a horizontal rule (by clicking it) inserted in page. It
corresponds to the <HR> tag in the Tag Selector:

To configure this panel, follow the instructions below:
In the Element ID text box enter the value for the id attribute. It will uniquely identify the element (horizontal rule) in page.
The width of a horizontal rule is relative to the page width. In the Width text box enter a number that can represent either pixels or percents (of the page width). Select one of these two options from the associated drop-down menu.
In the Height text box enter the number of pixels for the horizontal rule's height. The greater the number is, the deeper the delimitation space (between the two paragraphs the horizontal line separates) will be.
The H Align drop-down
menu contains the options for the position of the horizontal rule relatively
to the page's width:
Note: If the rule is as wide as the page, aligning it to the
left, right, center, would not make a difference in its position. But
when the rule's width is smaller than the page width, then its alignment
options will be visible.
Default
Left
Center
Right
If you check the Shading option, the inside area of the horizontal rule (its thickness is given but the height) will be transparent. If left unchecked, the rectangle corresponding to the horizontal rule will be filled with a shade of gray.