![]()
![]()
In order to insert a list/menu item inside a form in page (or even independent
from the form) click the List/Menu button from
the toolbar:

Note: If the cursor is not placed inside a form (inside the red dotted border) a dialog box will be displayed asking whether to add the form as well.
With a list you can make multiple selections, while with a menu you can only select one option. Set advanced list/menu options by using the List/Menu Properties panel.
The List/Menu Properties panel is displayed
when you select (click on) a list/menu item inserted in your page. It
corresponds to the <SELECT> tag in the Tag Selector:

To configure this panel, follow the instructions below:
In the Element ID text box enter the value for the id attribute. It will uniquely identify the element (list/menu) in page.
With the Type radio group decide if you want the list/menu item to be displayed as a:
Menu - a drop-down menu that only shows one option when the form loads. To view all the options, click the down arrow in the drop-down menu.
List - it displays more options when the form loads, and it can also allow multiple selections.
The Height text box is only enabled if the form item type is list. Enter the number of elements that you want the list to display (how many rows it should have).
The Allow multiple selections checkbox is only enabled if the element type is list. Check it if you want multiple selections (of the list elements) to be possible.
By clicking the List Values
button, a dialog box pops-up and allows you to add/edit elements (labels
and values) in the list/menu control:

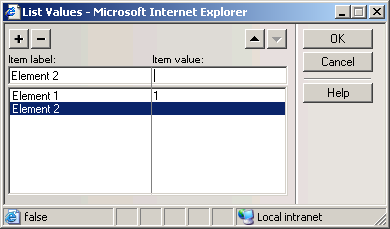
The List Values window presents the following
controls:
The Plus (+) / Minus (-) buttons allow you to add/remove elements from the list/menu control.
In the Item label and Item value text boxes enter the label (text displayed in the form control) and the value (value submitted to the server) for the current list element. The already entered elements are displayed below.
With the up (^) and down (v) arrows you can change the order of the list elements (in this same order they will be displayed in the form control).
Click OK when you are done configuring the list elements.
Click Cancel to exit without any new settings to be applied.
The Help button opens the contextual help window.